
Quick Recipe Version (TL;DR)
Quick Ingredients
- 3 firm, crisp apples (about 1.5 lb / 680 g)
- 1 cup apple cider vinegar (5% acidity)
- 1/2 cup water
- 1/3 cup pure maple syrup
- 2 tbsp granulated sugar
- 1 1/2 tsp kosher salt
- 1 cinnamon stick (3-inch)
- 4 whole cloves
- 4 whole allspice berries (optional)
- 1/2 tsp whole black peppercorns
- 1 strip lemon peel (about 1 x 3 inches) or 1 tbsp lemon juice
Do This
- 1. Core and thinly slice apples (leave skin on); pack snugly into a clean 1-quart glass jar.
- 2. In a small saucepan, combine vinegar, water, maple syrup, sugar, salt, cinnamon stick, cloves, allspice, peppercorns, and lemon peel.
- 3. Bring to a boil over medium heat, stirring to dissolve sugar and salt; simmer 1 to 2 minutes until fragrant.
- 4. Carefully pour the hot brine and spices over the apples, pressing apples down so they are fully submerged.
- 5. Let cool to room temperature, uncovered, about 30 minutes.
- 6. Seal the jar and refrigerate at least 2 hours, preferably overnight, for best flavor.
- 7. Serve chilled with cheese boards, sandwiches, roast meats, or salads. Keeps refrigerated up to 2 weeks.
Why You’ll Love This Recipe
- Transforms simple apples into a jewel-toned, tangy-sweet condiment with cozy cinnamon and clove.
- Perfect make-ahead topping for cheese boards, sandwiches, pork, chicken, and grain bowls.
- Quick stovetop method: no canning required and ready to eat the same day.
- Easy to customize: adjust sweetness, spice level, and vinegar bite to suit your taste.
Grocery List
- Produce: Firm crisp apples (such as Honeycrisp, Pink Lady, or Granny Smith), 1 lemon (for peel or juice)
- Dairy: Optional cheeses for serving (sharp cheddar, creamy goat cheese, aged gouda, blue cheese)
- Pantry: Apple cider vinegar, pure maple syrup, granulated sugar, kosher salt, whole cinnamon stick, whole cloves, whole allspice berries, whole black peppercorns
Full Ingredients
For the Apples
- 3 medium firm, crisp apples (about 1.5 lb / 680 g total), such as Honeycrisp, Pink Lady, Braeburn, or Granny Smith
- 1 cup cold water (for optional anti-browning soak, not part of brine)
- 1 tbsp lemon juice (for optional anti-browning soak, not part of brine)
For the Warm-Spice Maple Pickling Brine
- 1 cup apple cider vinegar (5% acidity)
- 1/2 cup water
- 1/3 cup pure maple syrup
- 2 tbsp granulated sugar (add 1 tbsp for less sweet, 3 tbsp for sweeter)
- 1 1/2 tsp kosher salt (use 1 tsp if using fine table salt)
- 1 cinnamon stick (3-inch)
- 4 whole cloves
- 4 whole allspice berries (optional but recommended for warmth)
- 1/2 tsp whole black peppercorns
- 1 strip lemon peel, about 1 x 3 inches (use a vegetable peeler to avoid the bitter white pith)
- 1/2 tsp vanilla extract (optional, for a dessert-like aroma)
Optional for Serving
- Assorted cheeses (sharp cheddar, brie, goat cheese, aged gouda)
- Crusty bread or crackers
- Roasted nuts or toasted walnuts/pecans
Step-by-Step Instructions
Step 1: Prepare the jar and gather your ingredients
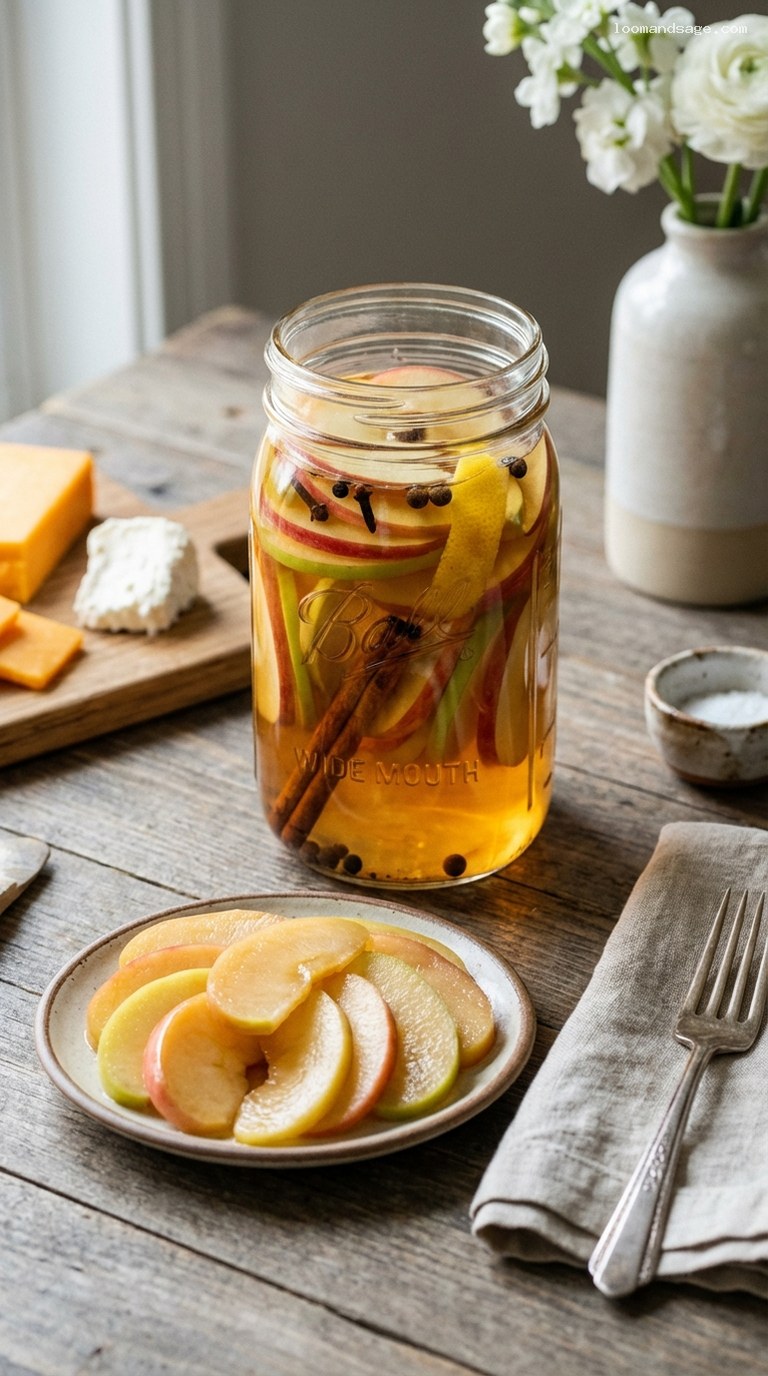
Choose a clean 1-quart (1 liter) glass jar with a tight-fitting lid. Wash it in hot, soapy water, rinse well, and let it air-dry or dry with a clean towel. Gather all ingredients and measure them out before you start; the process moves quickly once the brine is heating. This recipe makes enough to fill one packed quart jar. If you prefer, you can use two pint jars instead—just divide the apples and spices between them evenly.
Step 2: Slice the apples
Rinse the apples well and dry them. Leaving the peel on for color and texture, cut each apple into quarters, remove the core, and then slice into thin wedges about 1/8 to 1/4 inch thick. Thinner slices will absorb the brine faster but stay pleasantly crisp; thicker slices will be crunchier but need a bit longer in the fridge for full flavor. As you slice, you can place the apples in a bowl of 1 cup cold water mixed with 1 tbsp lemon juice to help prevent browning, especially if you are working slowly.
Step 3: Pack the apples into the jar
Drain the apple slices (if using the lemon-water soak) and pat them dry with a clean towel. Pack the slices snugly into your jar, standing some vertically against the glass to show off the red and green skins if you like a pretty presentation. Leave about 1/2 inch of space at the top of the jar to allow the brine to fully cover the apples. Do not worry if the apples sit a little above the shoulder of the jar; they will soften slightly and settle as the hot brine is added.
Step 4: Make the warm-spice maple brine
In a small saucepan, combine the apple cider vinegar, 1/2 cup water, maple syrup, granulated sugar, and kosher salt. Add the cinnamon stick, cloves, allspice berries (if using), black peppercorns, and the strip of lemon peel. Stir to mix. Set the pan over medium heat and bring the mixture to a gentle boil, stirring occasionally to dissolve the sugar and salt. Once it reaches a boil, reduce the heat and simmer for 1 to 2 minutes, just until the brine smells fragrant and the spices begin to release their aroma. Remove from the heat and stir in the vanilla extract, if using.
Step 5: Pour the hot brine over the apples
Place the jar of apples in the sink to catch any spills. Carefully ladle or pour the hot brine, along with all of the whole spices and lemon peel, over the apples. Pour slowly to avoid splashing. Use a clean spoon to gently press the apples down so they are fully submerged and to release any trapped air bubbles. If needed, you can top off the jar with a tablespoon or two of hot water so the apples are completely covered. The cinnamon stick and lemon peel can be tucked down the sides of the jar for a decorative look.
Step 6: Cool, cover, and refrigerate
Let the jar stand at room temperature, uncovered or loosely covered, for about 30 minutes, until the contents are no longer steaming and the glass feels warm but not hot. Wipe the rim of the jar with a clean, damp cloth, then seal with the lid. Transfer to the refrigerator and chill for at least 2 hours before tasting. The flavor will be mild at 2 hours but already delicious; for fully developed flavor and deeper color, let the apples pickle overnight (8 to 24 hours).
Step 7: Serve, enjoy, and replenish
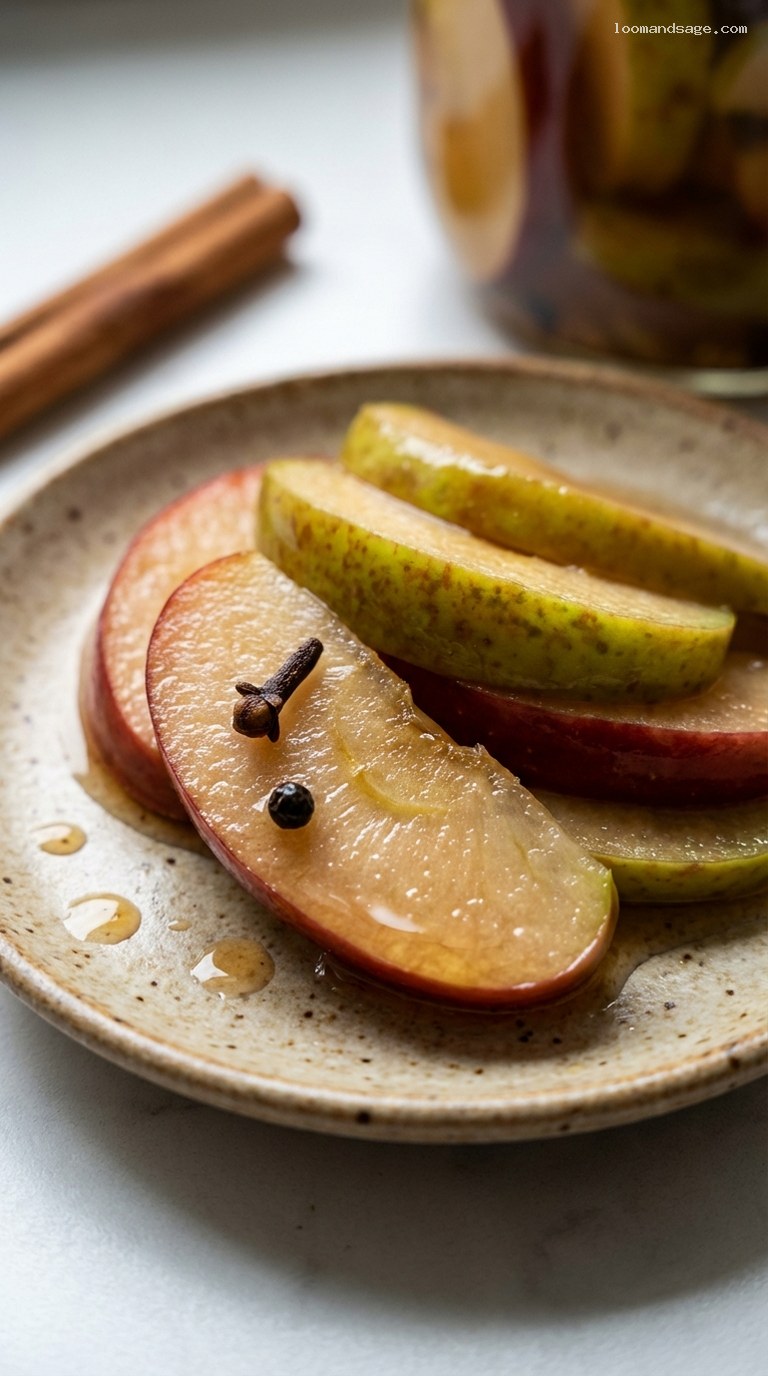
To serve, use a clean fork or tongs to lift out the apple slices, letting excess brine drip back into the jar. Arrange on a cheese board with your favorite cheeses, nuts, and bread, or tuck into sandwiches, burgers, or grilled cheese. They are also excellent sliced over salads or alongside roast pork or chicken. Keep the apples tightly covered and refrigerated; they are best within 10 to 14 days. As long as the apples stay submerged, the texture and flavor will remain bright and crisp. Discard if you ever notice an off smell, unusual cloudiness, or mold.
Pro Tips
- Pick the right apples: Use firm, crisp varieties like Honeycrisp, Pink Lady, Braeburn, or Granny Smith. Softer apples (like McIntosh) can become mushy in the brine.
- Control the sweetness: Taste the hot brine before pouring it over the apples. If you prefer it sweeter, add an extra 1 to 2 tsp sugar or maple; for tangier pickles, reduce the sugar slightly.
- Slice thickness matters: Thinner slices (1/8 inch) pickle faster and are ideal for sandwiches; slightly thicker slices (closer to 1/4 inch) stay extra crisp for cheese boards.
- Keep apples submerged: If a few slices want to float, press them down with a small piece of parchment or a clean, food-safe weight so they stay under the brine.
- Use non-reactive equipment: Stick to glass, stainless steel, or enamel for the saucepan and jar. Avoid aluminum, which can react with the vinegar.
Variations
- Spiced apple-ginger pickles: Add 4 to 6 thin slices of fresh ginger to the brine along with the spices. The ginger adds a gentle heat and a bright, zesty aroma that is especially good with Asian-inspired dishes and roasted meats.
- Chili-maple pickled apples: Add 1/2 to 1 tsp red pepper flakes, or 1 thinly sliced fresh red chili, to the brine for a sweet-hot version that is perfect on burgers, pulled pork sandwiches, and grilled cheese.
- Apple and pear mix: Replace 1 of the apples with a firm pear. Slice and pack them together for a beautiful two-fruit pickle that pairs wonderfully with blue cheese and walnuts.
Storage & Make-Ahead
These are refrigerator pickles, not shelf-stable canned pickles. Once cooled and sealed, store the jar in the refrigerator for up to 2 weeks for best flavor and texture. They are at their peak from day 2 through about day 10. You can easily make them several days ahead before a party; the warm spices and maple flavor will continue to deepen. Always use clean utensils to remove apples from the jar, and ensure the slices remain submerged in the brine to keep them fresh and safe. Leftover brine can be whisked into salad dressings or used to quick-pickle more apple slices.
Nutrition (per serving)
Approximate values per serving (about 1/4 cup pickled apple slices with a little brine): 60 calories; 0 g fat; 0 g saturated fat; 15 g carbohydrates; 13 g sugars; 0 g protein; 0 g fiber; about 160 mg sodium. These numbers are estimates and will vary based on the exact apples, sweetness adjustments, and how much brine you consume.
