

Quick Recipe Version (TL;DR)
Quick Ingredients
- 2 cans (15 oz / 425 g each) chickpeas, drained and rinsed
- 4 garlic cloves, thinly sliced
- 1–2 fresh red chilies, thinly sliced
- 3 tbsp chopped fresh parsley
- 2 tbsp chopped fresh cilantro (optional)
- Peel of 1 lemon (in strips) + 3 tbsp lemon juice
- 3/4 cup white or apple cider vinegar
- 3/4 cup water
- 2 1/2 tbsp sugar or honey
- 2 tsp kosher salt
- 1 tsp whole black peppercorns
- 1/2 tsp red pepper flakes
- 1 bay leaf
- 2 tbsp extra-virgin olive oil
Do This
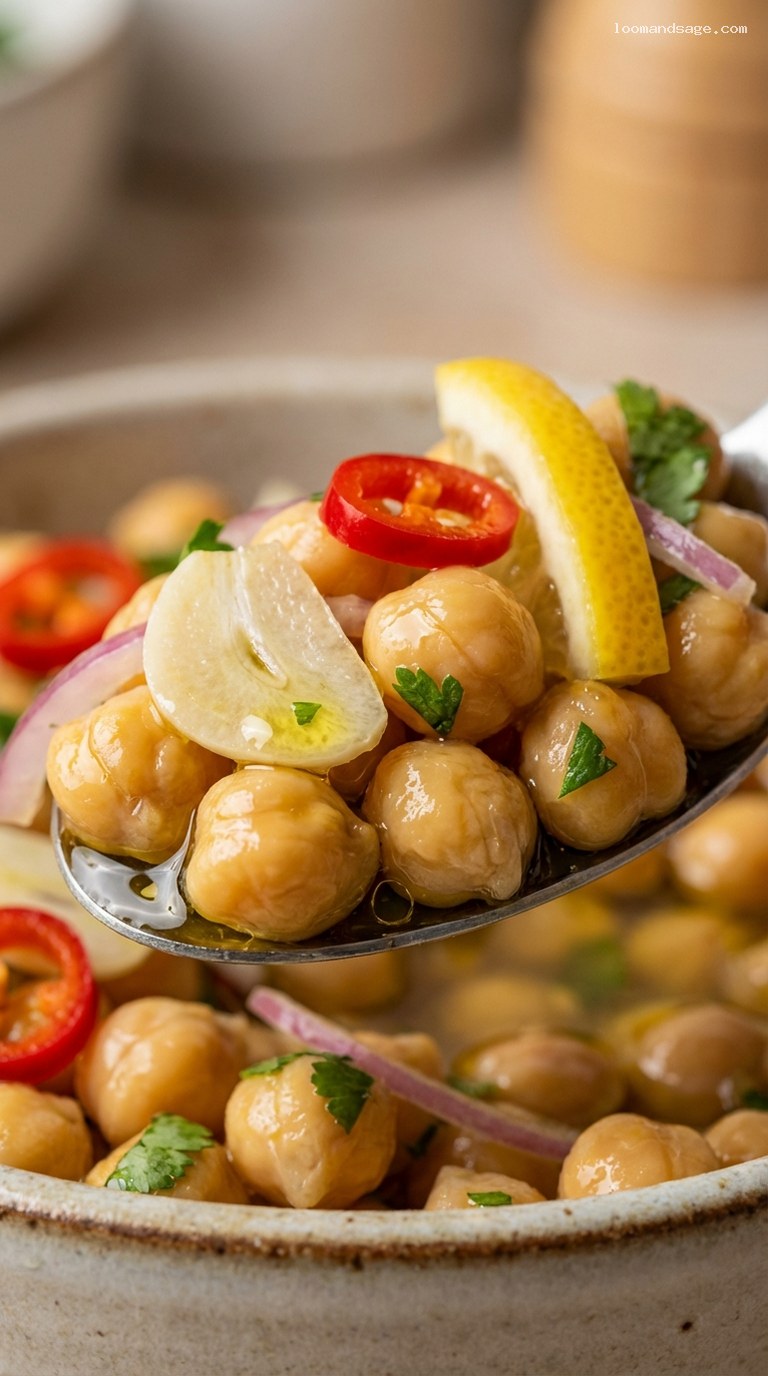
- 1. Rinse and drain chickpeas well; pack them into a clean 1-quart jar (or two smaller jars).
- 2. Add sliced garlic, chilies, lemon peel strips, chopped herbs, and any optional sliced red onion to the jar.
- 3. In a small saucepan, combine vinegar, water, lemon juice, sugar, salt, peppercorns, red pepper flakes, and bay leaf.
- 4. Bring brine to a simmer over medium heat, stirring until sugar and salt dissolve; simmer 1–2 minutes, then remove from heat.
- 5. Carefully pour hot brine over chickpeas and aromatics, making sure everything is submerged. Cool 20–30 minutes.
- 6. Stir in olive oil, seal the jar, and refrigerate at least 4 hours (ideally 12–24 hours) to pickle and develop flavor.
- 7. Serve chilled or at cool room temperature as a snack, salad topper, or side, with extra herbs and lemon if you like.
Why You’ll Love This Recipe
- Zesty, bright, and a little spicy, these pickled chickpeas wake up salads, grain bowls, and snack boards.
- Prep is fast and easy: just slice, simmer a simple brine, and pour it over pantry staples.
- Make-ahead friendly: they actually taste better after a day or two in the fridge.
- Flexible and customizable: adjust the heat level, switch up the herbs, or add your favorite crunchy veggies.
Grocery List
- Produce: 1 lemon, 4 garlic cloves, 1–2 fresh red chilies (Fresno, jalapeño, or serrano), 1 small red onion or 2 shallots (optional), fresh flat-leaf parsley, fresh cilantro (optional), fresh herbs for serving (parsley, cilantro, or mint)
- Dairy (optional for serving): Feta cheese, plain Greek yogurt (for a creamy bowl or dip)
- Pantry: Canned chickpeas, distilled white vinegar or apple cider vinegar, granulated sugar or honey, kosher salt, whole black peppercorns, red pepper flakes, bay leaf, extra-virgin olive oil
Full Ingredients
For the Chickpeas and Aromatics
- 2 cans (15 oz / 425 g each) chickpeas, drained and rinsed well (or 3 cups / about 500 g cooked chickpeas)
- 4 large garlic cloves, thinly sliced
- 1–2 fresh red chilies (Fresno, jalapeño, or serrano), thinly sliced into rings (remove some seeds for less heat)
- 3 tbsp chopped fresh flat-leaf parsley
- 2 tbsp chopped fresh cilantro (optional; omit if you dislike cilantro)
- 1 small red onion or 2 medium shallots, very thinly sliced (optional but delicious for extra tang and crunch)
- Peel of 1 lemon, cut in wide strips with a vegetable peeler (avoid the white pith as much as possible)
For the Zesty Pickling Brine
- 3/4 cup (180 ml) distilled white vinegar (5% acidity) or apple cider vinegar
- 3/4 cup (180 ml) water
- 3 tbsp (45 ml) freshly squeezed lemon juice (from the peeled lemon)
- 2 1/2 tbsp (30 g) granulated sugar or liquid honey
- 2 tsp kosher salt (Diamond Crystal; if using table salt, use 1 1/4 tsp)
- 1 tsp whole black peppercorns
- 1/2 tsp red pepper flakes (use less for mild, more for hot)
- 1 bay leaf
- 2 tbsp extra-virgin olive oil (stirred in after cooling, for richness and flavor)
For Serving (Optional but Highly Recommended)
- Extra chopped fresh herbs (parsley, cilantro, or fresh mint)
- Extra-virgin olive oil, for drizzling
- Crumbled feta cheese
- Lemon wedges
- Warm pita, crusty bread, or cooked grains (quinoa, farro, couscous) for turning into a quick meal
Step-by-Step Instructions
Step 1: Prep your jar and ingredients
Choose a clean glass jar with a tight-fitting lid: one 1-quart (32 fl oz / 950 ml) jar, or two pint (16 fl oz / 475 ml) jars. Wash the jar and lid in hot soapy water, then rinse and let air-dry, or run them through the dishwasher. They do not need to be sterilized for this quick refrigerator pickle, but they should be very clean.
Drain and rinse the chickpeas under cool running water for 20–30 seconds to remove excess starch and canning liquid. Let them drain well in a colander while you prep the aromatics. Thinly slice the garlic and fresh chilies. If using, peel and finely slice the red onion or shallots into thin half-moons. Roughly chop the fresh parsley and cilantro. Use a vegetable peeler to remove the lemon peel in wide strips, avoiding as much of the bitter white pith as possible.
Step 2: Pack the chickpeas and aromatics into the jar
Add the drained chickpeas to your jar, leaving about 1 inch (2.5 cm) of headspace at the top. Tuck in the sliced garlic, chili rings, and optional sliced red onion or shallots, distributing them evenly throughout the chickpeas instead of leaving them all on top. This helps every scoop get some flavor and color.
Add the chopped parsley and cilantro, sprinkling them between layers of chickpeas. Slide the strips of lemon peel down the sides of the jar where you can see them; they will look pretty and infuse the brine with bright citrus aroma. Gently tap the jar on the counter to help everything settle.
Step 3: Make the zesty pickling brine
In a small saucepan, combine the vinegar, water, lemon juice, sugar (or honey), kosher salt, whole black peppercorns, red pepper flakes, and the bay leaf. Stir well to dissolve the sugar and salt as much as possible. Place the pan over medium heat and bring the mixture to a gentle simmer.
Once it starts to simmer, cook for 1–2 minutes, stirring occasionally, just until the sugar and salt are fully dissolved and the spices are fragrant. There is no need to boil vigorously; a gentle simmer is enough. Remove the saucepan from the heat and let the brine sit for 2–3 minutes so the bubbling subsides. This brief rest also slightly cools the liquid so it is hot, but not violently boiling, when you pour it over the chickpeas.
Step 4: Pour the hot brine over the chickpeas
Place the packed jar of chickpeas on a folded kitchen towel (this helps prevent thermal shock when adding hot liquid). Using a ladle or heatproof measuring cup, carefully pour the hot brine into the jar, making sure to include the peppercorns and bay leaf.
Pour slowly, allowing the brine to work its way down into the spaces between the chickpeas. If needed, use a clean spoon or butter knife to gently stir and release any trapped air bubbles. Top up with brine until all the chickpeas and aromatics are fully submerged, leaving about 1/4 inch (0.5 cm) of headspace. If you run slightly short on liquid, you can top off with a bit of hot water, but usually the brine amount will be just right.
Step 5: Cool, add olive oil, and refrigerate
Let the jar stand uncovered at room temperature for about 20–30 minutes, or until the contents are warm but no longer steaming. This step is important: sealing the jar while it is still very hot can create a strong vacuum and pull in unwanted flavors from the lid, and you also want the olive oil to stay vibrant and not overheat.
Once the jar has cooled slightly, pour in the 2 tbsp of extra-virgin olive oil. You can either pour it on top (it will float as a flavorful layer) or gently stir it into the brine so it coats the chickpeas more evenly. Wipe the rim of the jar if needed, then seal tightly with the lid. Transfer to the refrigerator and chill for at least 4 hours. For the best flavor and texture, let the chickpeas pickle for 12–24 hours before serving.
Step 6: Taste, adjust, and serve
When you are ready to eat, open the jar and give everything a gentle stir to redistribute the garlic, chilies, herbs, and spices. Taste one chickpea and a bit of brine. If you would like more acid, you can stir in an extra splash of vinegar or lemon juice directly in the jar. For more heat, add a pinch of red pepper flakes. For a touch more sweetness, stir in a tiny bit of honey or sugar until it dissolves.
Serve the pickled chickpeas chilled or let them sit at room temperature for 10–15 minutes to take the chill off. Spoon them over salads or grain bowls, pile them into a small bowl as a zesty appetizer, or serve alongside cheese, olives, and bread. Garnish with extra chopped herbs, a drizzle of olive oil, and crumbled feta cheese if you like. Do not forget to use some of the flavorful brine as a bright, punchy dressing.
Step 7: Ideas for using your pickled chickpeas
These chickpeas are extremely versatile. Toss them with chopped cucumbers, tomatoes, and red onion for a quick salad. Add them to a simple green salad, using the brine as part of the dressing. Spoon over warm cooked grains (like quinoa, couscous, rice, or farro) with extra herbs and a dollop of yogurt for an instant bowl. Scatter them on top of avocado toast for crunch and tang, or add them to wraps and sandwiches for a pop of flavor.
They also shine on mezze-style platters with hummus, olives, grilled vegetables, and pita. Because they are already seasoned and marinated, they make it easy to build satisfying, colorful meals with almost no extra cooking.
Pro Tips
- Rinse chickpeas well: A thorough rinse removes the canning liquid, which can taste metallic and dull the bright pickling flavors.
- Slice everything thinly: Thin slices of garlic, chilies, and onion pickle more quickly and release their flavor throughout the jar.
- Let them rest overnight: The minimum 4 hours is good, but 12–24 hours in the fridge gives you much deeper, more balanced flavor.
- Keep everything submerged: For best quality and food safety, be sure the chickpeas and aromatics stay under the brine; add a splash more vinegar and water (50/50) if needed.
- Use the brine as dressing: Do not throw it away. Whisk a few spoonfuls with extra olive oil for an instant, zippy vinaigrette.
Variations
- Smoky paprika version: Add 1/2–1 tsp smoked paprika to the warm brine and stir well. Optional: add a small piece of roasted red pepper to the jar for a deeper smoky note.
- Mediterranean herb and olive: Swap cilantro for fresh oregano or thyme, and add a handful of pitted green or Kalamata olives to the jar. Finish with crumbled feta and extra lemon at serving time.
- Warm-spiced version: Replace the red pepper flakes with 1/2 tsp ground cumin and 1/4 tsp ground coriander, and add a small cinnamon stick to the brine for a gently spiced, less spicy flavor profile.
Storage & Make-Ahead
These zesty pickled chickpeas are designed as a refrigerator pickle, not a shelf-stable canned product. Once cooled and sealed, store the jar in the refrigerator for up to 10–14 days. Always use a clean spoon or fork to remove chickpeas from the jar to keep the brine fresh. Make sure the chickpeas and aromatics remain submerged in the liquid; if the liquid level drops, top up with a small splash of vinegar and water (in equal parts).
They are perfect for meal prep: make a batch on the weekend and use them all week in salads, bowls, and snacks. The flavor is usually at its best between day 2 and day 7, when the chickpeas have fully absorbed the brine but are still pleasantly firm.
Nutrition (per serving)
Approximate values per serving (about 1/2 cup, based on 6 servings): 170 calories; 7 g protein; 23 g carbohydrates; 5 g dietary fiber; 5 g total fat; 0.5 g saturated fat; 0 mg cholesterol; about 420 mg sodium. Values will vary based on the exact brand of chickpeas, the type of vinegar, and how much brine and oil you consume.
