
Quick Recipe Version (TL;DR)
Quick Ingredients
- 3 cups (360 g) cake flour or all-purpose flour
- 2 1/2 tsp baking powder, 1/2 tsp baking soda, 3/4 tsp fine salt
- 1 cup (226 g) unsalted butter (cake) + 1 1/2 cups (340 g) unsalted butter (frosting), room temp
- 2 cups (400 g) granulated sugar + 2 tbsp (25 g) for chocolate batter
- 4 large eggs, room temperature
- 2 tsp vanilla extract (cake) + 2 tsp vanilla extract (frosting)
- 1 3/4 cups (420 ml) whole milk or buttermilk, room temp
- 1/3 cup (35 g) unsweetened cocoa powder + 3 tbsp (45 ml) hot milk or water
- 5 cups (600 g) powdered sugar, sifted
- 1/3 cup (80 ml) heavy cream or milk (plus extra as needed)
- Optional: chocolate sprinkles, shaved chocolate, or fresh berries for decoration
Do This
- 1. Preheat oven to 350°F (177°C). Grease and line four 8-inch round cake pans with parchment.
- 2. Make vanilla batter: cream 1 cup butter and 2 cups sugar; beat in 4 eggs and 2 tsp vanilla. Mix in dry ingredients alternately with 1 3/4 cups milk.
- 3. Divide batter evenly into two bowls. Leave one vanilla. To the other, add cocoa mixed with hot milk and 2 tbsp sugar to make chocolate batter.
- 4. Fill two pans with vanilla batter and two with chocolate. Bake 22–25 minutes until a toothpick comes out clean. Cool completely.
- 5. Level cakes, chill briefly, then cut each into 3 concentric rings with round cutters or a knife. Rebuild 4 layers with alternating vanilla and chocolate rings.
- 6. Make frosting: beat 1 1/2 cups butter until creamy; gradually add powdered sugar, cream, vanilla, and salt until fluffy.
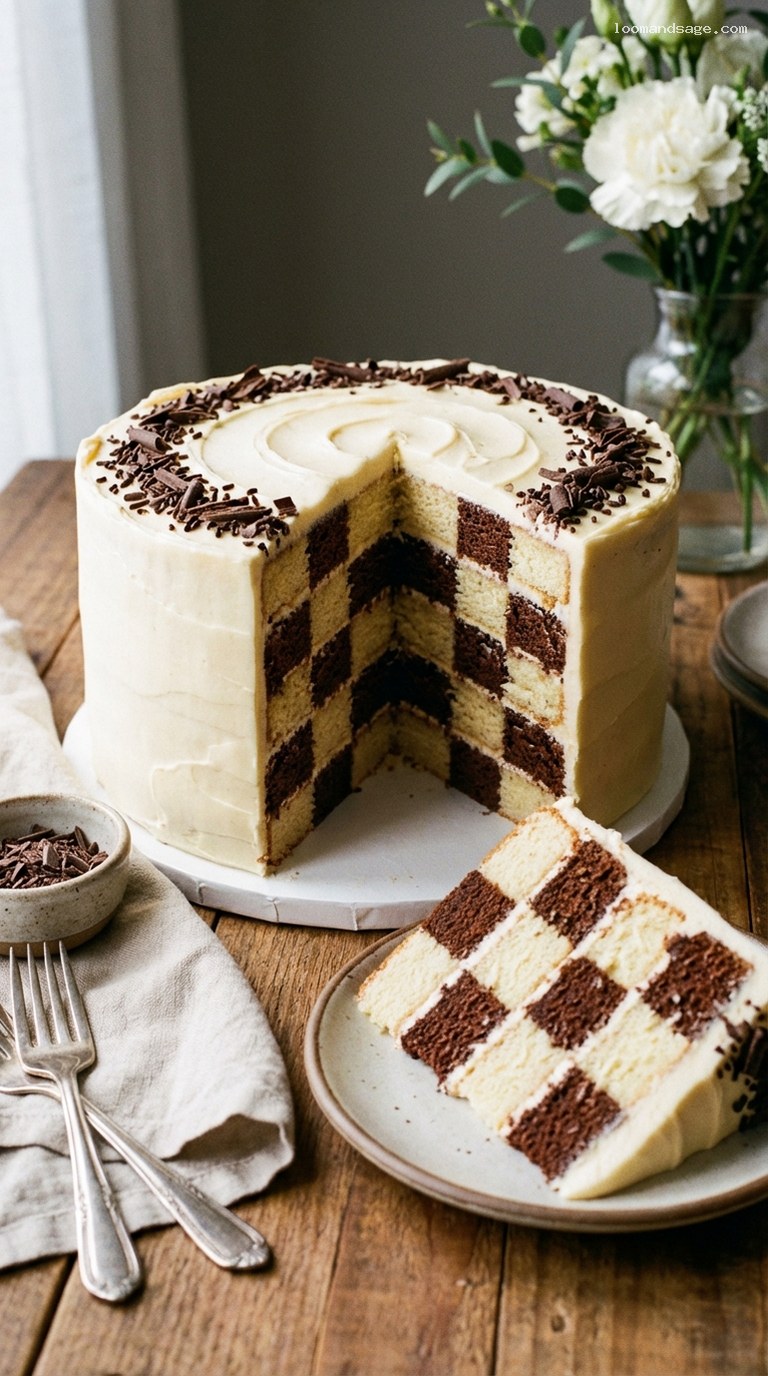
- 7. Stack layers with frosting between, rotating every other layer. Crumb coat, chill, then apply a smooth final coat. Decorate simply. Slice to reveal checkerboard pattern.
Why You’ll Love This Recipe
- Looks wildly impressive when sliced, but uses straightforward techniques any patient home baker can master.
- Classic flavors: tender vanilla and cocoa-rich chocolate cake wrapped in a creamy vanilla buttercream.
- Perfect for birthdays, celebrations, and any time you want a showstopper dessert with a surprise inside.
- Flexible: use special checkerboard pans if you have them, or follow the ring-cutting method with regular round pans.
Grocery List
- Produce: Optional: fresh berries (strawberries, raspberries) and fresh mint for garnish.
- Dairy: Unsalted butter, whole milk or buttermilk, heavy cream (or extra milk), large eggs.
- Pantry: Cake flour or all-purpose flour, granulated sugar, powdered sugar, unsweetened cocoa powder, vanilla extract, baking powder, baking soda, fine salt, nonstick spray or extra butter for greasing pans.
Full Ingredients
For the Vanilla–Chocolate Checkerboard Cake Layers
- 3 cups (360 g) cake flour or all-purpose flour, spooned and leveled
- 2 1/2 tsp baking powder
- 1/2 tsp baking soda
- 3/4 tsp fine sea salt
- 1 cup (226 g) unsalted butter, softened to room temperature
- 2 cups (400 g) granulated sugar
- 4 large eggs, at room temperature
- 2 tsp pure vanilla extract
- 1 3/4 cups (420 ml) whole milk or buttermilk, at room temperature
For the Chocolate Portion of the Batter
- 1/3 cup (35 g) unsweetened natural cocoa powder
- 3 tbsp (45 ml) very hot milk or hot water
- 2 tbsp (25 g) granulated sugar
For the Vanilla Buttercream Frosting
- 1 1/2 cups (340 g) unsalted butter, softened to room temperature
- 5 cups (600 g) powdered sugar, sifted
- 1/3 cup (80 ml) heavy cream or whole milk, plus 1–3 tbsp extra as needed for consistency
- 2 tsp pure vanilla extract
- 1/4 tsp fine sea salt (or to taste)
Optional Chocolate Buttercream Variation
- 1/3 cup (35 g) unsweetened natural cocoa powder
- 2–3 tbsp (30–45 ml) extra heavy cream or milk
For Decorating (Simple and Elegant)
- Chocolate sprinkles, chocolate curls, or shaved chocolate (about 1/2 cup / 60 g)
- Or a light dusting of cocoa powder
- Optional: fresh berries and/or small mint sprigs for serving
Step-by-Step Instructions
Step 1: Prep the pans and ingredients
Preheat your oven to 350°F (177°C) with a rack in the center (and a second rack above if you plan to bake all four layers at once). Lightly grease four 8-inch (20 cm) round cake pans with butter or nonstick spray. Line the bottoms with parchment rounds, then grease the parchment as well. This helps the delicate layers release cleanly.
In a medium bowl, whisk together the flour, baking powder, baking soda, and salt. Set aside. In a small heatproof bowl, whisk the cocoa powder, 3 tbsp hot milk or water, and 2 tbsp sugar until smooth with no lumps; this paste will be stirred into half of the batter later to make the chocolate layers. Allow the cocoa mixture to cool slightly while you make the vanilla batter.
Make sure your butter and eggs are at room temperature so the batter mixes smoothly and rises evenly. If your eggs are cold, place them in a bowl of warm (not hot) water for 10 minutes.
Step 2: Make the vanilla cake batter
In a large mixing bowl (a stand mixer with paddle attachment works well), beat 1 cup softened butter on medium speed until smooth and creamy, about 1 minute. Gradually add the 2 cups granulated sugar and beat on medium-high until the mixture is light and fluffy, 3–4 minutes. Scrape down the bowl as needed.
Add the eggs one at a time, beating well after each addition, then mix in the 2 tsp vanilla extract. The batter may look slightly curdled at this stage; it will smooth out once you add the dry ingredients.
On low speed, add the dry ingredients in three additions, alternating with the milk or buttermilk in two additions. Begin and end with the dry ingredients: add about one-third of the flour mixture, then half the milk, another third of the flour, the remaining milk, and finally the last third of the flour. Mix just until combined and no dry streaks remain. Avoid over-mixing, which can toughen the cake.
Step 3: Turn half the batter into chocolate
Weigh the bowl of batter if you have a kitchen scale, then spoon half of the batter into a second large bowl so you have equal amounts in two bowls. If you do not have a scale, eyeball the division as evenly as possible.
Leave one bowl as your vanilla batter. To the second bowl, add the cocoa mixture you prepared earlier. Gently fold or mix on low speed just until the cocoa is fully incorporated and the batter is evenly chocolate-colored. Scrape the bottom and sides of the bowl to ensure there are no vanilla streaks.
You now have one bowl of vanilla batter and one bowl of chocolate batter, ready to be baked into four even layers.
Step 4: Bake the cake layers
Divide the vanilla batter evenly between two of the prepared pans, and the chocolate batter evenly between the other two pans. If you have a scale, each pan should get roughly the same weight of batter so the layers bake to a similar thickness. Smooth the tops with an offset spatula.
Bake for 22–25 minutes, switching the pans between racks and rotating them front-to-back halfway through, until the tops spring back lightly when touched and a toothpick inserted in the center comes out clean or with a few moist crumbs.
Let the cakes cool in their pans on a wire rack for 10–15 minutes, then carefully run a knife around the edges, invert onto the rack, peel off the parchment, and let cool completely. For clean cuts later, cover and chill the cooled layers in the refrigerator for at least 30 minutes or up to 1 day.
Step 5: Level, chill, and cut the checkerboard rings
If any of the cake layers domed during baking, use a long serrated knife to gently level the tops so each layer is flat. Chilled cake is much easier to cut neatly, so if they are not chilled yet, pop the layers into the fridge or freezer for 20–30 minutes before cutting the rings.
To create the checkerboard pattern, you will cut each 8-inch round into three concentric rings. Use round cutters such as one 5-inch (12–13 cm) cutter and one 3-inch (7–8 cm) cutter. Center the 5-inch cutter on top of a cake layer and press straight down to cut out the middle ring. Then center the 3-inch cutter inside the 5-inch circle you just removed and cut again to form a small center disc. If you do not have cutters, trace 5-inch and 3-inch circles on parchment, place them on top of the cake, and cut carefully along the lines with a sharp knife.
Repeat with all four layers. You will end up with 12 pieces total: 4 large outer rings, 4 middle rings, and 4 center discs, half vanilla and half chocolate.
Step 6: Reassemble the checkerboard layers
To make the checkerboard effect, each finished layer should have alternating colors of cake from the outside in. For two of the layers, arrange a large vanilla ring, then fit a chocolate middle ring inside it, and finally place a vanilla center disc inside the chocolate ring (vanilla–chocolate–vanilla). For the other two layers, do the opposite: chocolate outer ring, vanilla middle ring, chocolate center (chocolate–vanilla–chocolate).
As you swap pieces, very lightly brush or dab a thin layer of milk, simple syrup, or a spoonful of frosting between the cut edges of the rings to help them adhere, if desired. Gently press the assembled rings together so each reconstructed layer feels like one solid cake. You should now have four complete round layers: two starting with vanilla on the outside and two starting with chocolate.
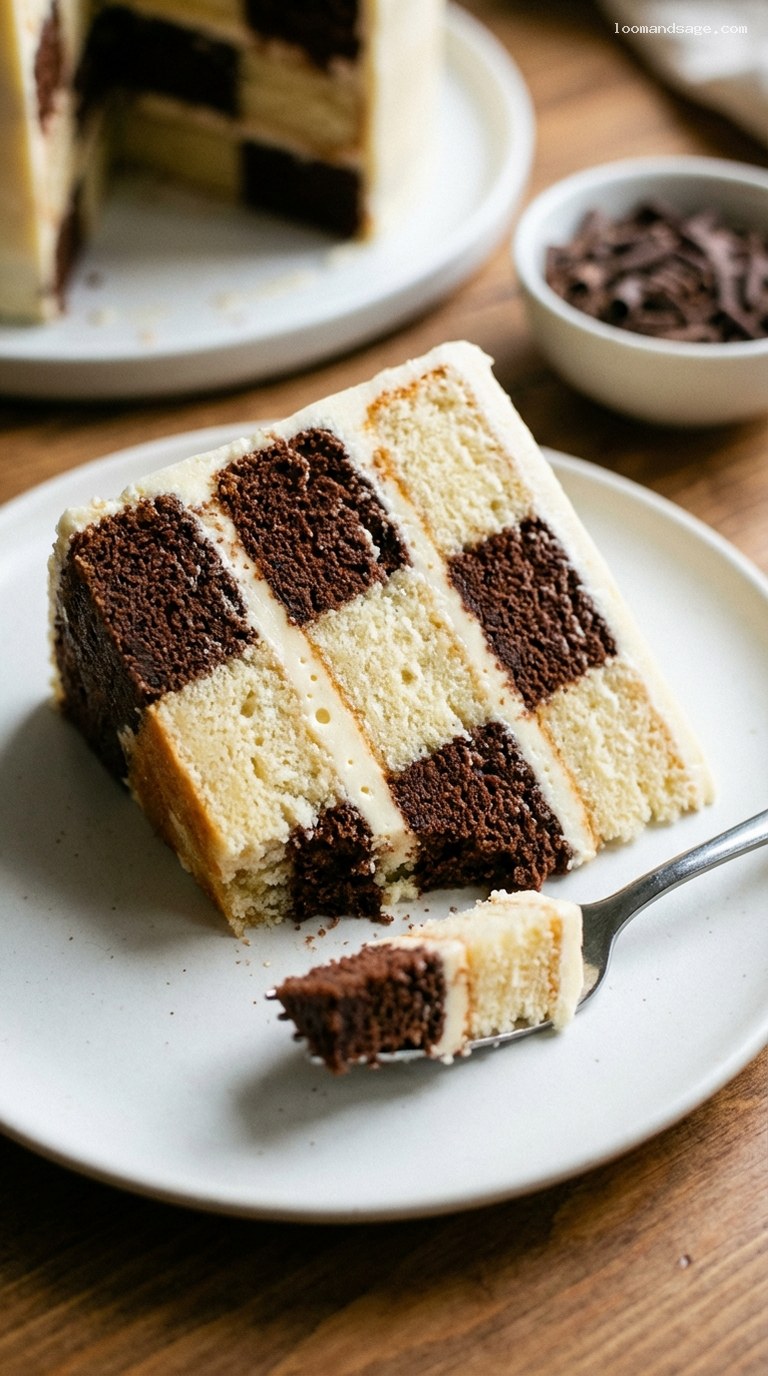
For the best checkerboard grid when sliced, plan to stack the layers in alternating order: vanilla-outside layer, chocolate-outside layer, vanilla-outside layer, chocolate-outside layer, rotating each layer by about 45 degrees as you stack so the squares do not line up perfectly from top to bottom.
Step 7: Make the vanilla buttercream
In a large bowl, beat 1 1/2 cups softened butter on medium speed until smooth and creamy, about 2 minutes. Gradually add the sifted powdered sugar, 1 cup at a time, mixing on low after each addition until incorporated. The mixture will be quite thick.
Add 1/3 cup heavy cream (or milk), the 2 tsp vanilla extract, and the 1/4 tsp salt. Beat on medium-high speed for 3–4 minutes until the frosting is light, fluffy, and spreadable. If it seems too thick, add more cream or milk 1 tablespoon at a time. If it is too soft, beat in a bit more powdered sugar.
For a chocolate buttercream variation, beat in 1/3 cup cocoa powder and 2–3 extra tablespoons of cream until smooth, and use it instead of (or along with) the vanilla frosting.
Step 8: Fill, stack, and frost the cake
Place a small dollop of frosting in the center of your serving plate or cake board to anchor the cake. Set one checkerboard layer (vanilla on the outside or chocolate—your choice) on the plate. Spread about 2/3–3/4 cup of frosting evenly over the top, stopping just before the edge.
Add the second layer on top, rotating it slightly so the pattern is offset from the first layer. Press down gently to adhere. Repeat the process with frosting and the remaining two layers, again rotating each to keep the checkerboard from lining up exactly.
Once stacked, spread a thin layer of frosting over the sides and top of the cake (this is the crumb coat). Chill the cake for 20–30 minutes to set the crumbs. Then apply a thicker, smooth final coat of frosting over the top and sides. Keep the outside simple and clean so the interior pattern is the star: consider a smooth white finish, a rustic swirl, or a ring of chocolate shavings or sprinkles around the base or top edge.
Refrigerate the finished cake for at least 30 minutes before slicing for the sharpest checkerboard pattern. Use a long, sharp knife and wipe it clean between slices.
Pro Tips
- Chill before cutting: Cold cake layers are much easier to level and cut into clean rings without crumbling.
- Use a scale if you can: Weighing the batter into pans ensures evenly sized layers, which keeps your tall cake stable and neat.
- Do not rush the cooling time: Assembling warm cake will cause the rings to tear and the frosting to melt.
- Crumb coat is your friend: That first thin layer of frosting traps crumbs so your final coat looks smooth and professional.
- Rotate layers thoughtfully: Offsetting each layer by 45 degrees creates the most dramatic checkerboard grid when you cut a slice.
Variations
- All-chocolate outside, vanilla inside: Frost the cake with chocolate buttercream and keep the exterior simple and dark so the pale vanilla-and-chocolate checkerboard surprises everyone when sliced.
- Strawberry checkerboard twist: Replace half of the vanilla extract with strawberry extract, tint the “vanilla” portion of the batter light pink, and fill the cake with a thin layer of strawberry jam beneath the buttercream.
- Smaller celebration cake: Halve the recipe and bake in two 6-inch pans, then cut into rings and assemble a shorter, petite checkerboard cake for 6–8 servings.
Storage & Make-Ahead
The fully assembled and frosted checkerboard cake will keep, covered, at cool room temperature for up to 1 day or refrigerated for up to 4 days. If refrigerating, let the cake sit at room temperature for 30–45 minutes before serving so the buttercream softens.
You can bake the cake layers up to 2 days ahead. Once fully cooled, wrap each layer tightly in plastic wrap and refrigerate, or freeze for up to 2 months. Frozen layers can be cut into rings more easily; just let them soften slightly so they are not rock-hard. Frosting can be made up to 3 days ahead and stored in an airtight container in the refrigerator; bring to room temperature and re-beat briefly before using.
Nutrition (per serving)
Approximate values for one of 16 servings (using vanilla buttercream and without optional decorations): about 600 calories; 8 g protein; 78 g carbohydrates; 30 g fat; 19 g saturated fat; 250 mg sodium; 58 g sugars; 1 g fiber. These values are estimates and will vary based on exact ingredients and portion sizes.
