
Quick Recipe Version (TL;DR)
Quick Ingredients
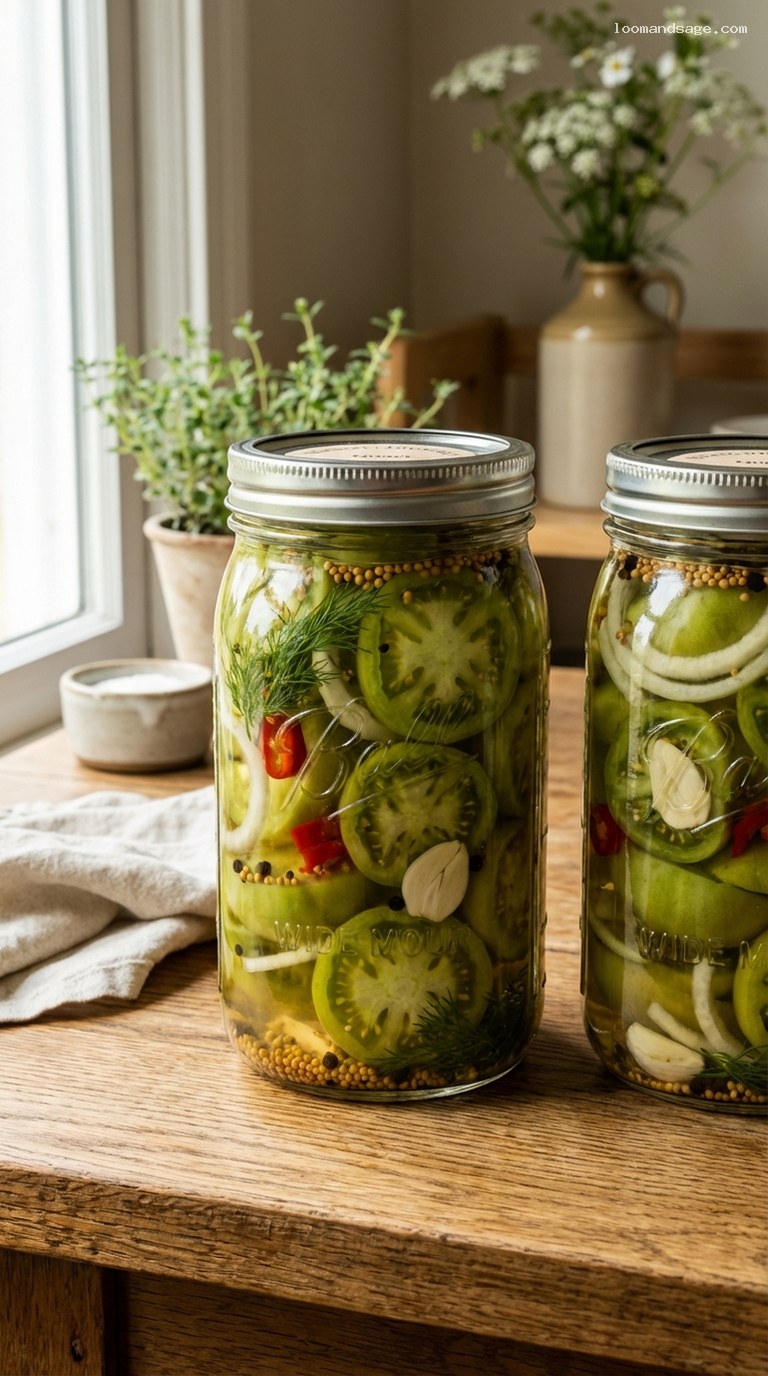
- 2 lb firm green tomatoes, sliced 1/4 inch thick
- 1 small onion, thinly sliced (optional)
- 4 cloves garlic, halved
- 4 fresh dill sprigs + 2 tsp dill seeds (or 1 Tbsp chopped fresh dill)
- 2 small red chilies, sliced (or 1 tsp red pepper flakes)
- 2 tsp mustard seeds
- 2 tsp black peppercorns
- 2 bay leaves
- 2 cups water
- 2 cups distilled white vinegar (5% acidity)
- 3 Tbsp kosher salt (2 Tbsp if using Morton brand)
- 2 Tbsp granulated sugar
- 2 clean quart jars with lids (or 4 pint jars)
Do This
- 1) Wash and slice tomatoes into 1/4-inch rounds or wedges; slice onion and chilies.
- 2) Divide garlic, dill, chilies, mustard seed, peppercorns, bay leaves, and onion between jars.
- 3) Pack tomato slices snugly into jars, leaving about 1/2 inch at the top.
- 4) In a saucepan, bring water, vinegar, salt, and sugar to a simmer, stirring to dissolve.
- 5) Carefully pour hot brine over tomatoes to cover, leaving 1/2 inch headspace.
- 6) Cool to room temperature, then seal and refrigerate at least 24 hours.
- 7) For best flavor and crunch, enjoy within 2 weeks and up to 2 months refrigerated.
Why You’ll Love This Recipe
- Transforms firm, unripe green tomatoes into a tangy, crunchy sandwich topper.
- Simple refrigerator pickle method: no canning equipment or special skills required.
- Balanced flavor: bright vinegar, fresh dill, mustard seed, and a gentle chili heat.
- Perfect for using up end-of-season garden tomatoes that refuse to ripen.
Grocery List
- Produce: Green tomatoes, small onion (optional), garlic, fresh dill, fresh red chilies.
- Dairy: None.
- Pantry: Distilled white vinegar, kosher or pickling salt, granulated sugar, mustard seeds, black peppercorns, bay leaves, red pepper flakes (optional).
Full Ingredients
For the Tomatoes and Aromatics
- 2 lb firm green tomatoes (unripe), washed and dried
- 1 small yellow or white onion, thinly sliced (optional, but delicious)
- 4 cloves garlic, peeled and halved lengthwise
- 4 fresh dill sprigs (about 4–5 inches each)
- 2 tsp dill seeds or 1 Tbsp additional chopped fresh dill
- 2 small fresh red chilies (Fresno, serrano, or similar), thinly sliced into rings
- 2 tsp black peppercorns
- 2 tsp mustard seeds (yellow or brown)
- 2 bay leaves, torn in half
For the Brine
- 2 cups water
- 2 cups distilled white vinegar (5% acidity; you can substitute up to 1 cup with apple cider vinegar if you like)
- 3 Tbsp kosher salt (about 27–30 g if using Diamond Crystal; use 2 Tbsp / about 30 g if using Morton)
- 2 Tbsp granulated sugar
Equipment
- 2 clean quart-size glass jars with tight-fitting lids (or 4 pint jars)
- Small saucepan (non-reactive: stainless steel or enameled)
- Sharp knife and cutting board
- Measuring cups and spoons
- Funnel (optional, but very helpful for pouring brine)

Step-by-Step Instructions
Step 1: Prep the jars and slice the tomatoes
Wash your jars and lids well in hot, soapy water, then rinse thoroughly. Since these are refrigerator pickles, there is no need to sterilize the jars in boiling water, but they should be very clean.
Rinse the green tomatoes and pat them completely dry. Using a sharp knife, slice them into 1/4-inch thick rounds or wedges, depending on how you like them for sandwiches. Rounds are great for layering on slices of bread, while wedges are nice for snacking.
Peel and thinly slice the onion (if using). Peel the garlic and cut each clove in half lengthwise. Thinly slice the fresh red chilies into rings, leaving the seeds in for more heat or removing some for milder pickles.
Step 2: Layer aromatics and tomatoes in the jars
Divide the sliced onion (if using), garlic halves, fresh dill sprigs, dill seeds (or extra chopped dill), sliced chilies, mustard seeds, black peppercorns, and bay leaves evenly between the jars. Place a portion of each in the bottom of each jar.
Pack the sliced tomatoes snugly into the jars on top of the aromatics. You can alternate layers of tomatoes with a few extra sprigs or slices of chili to make the jars look especially pretty. Leave about 1/2 inch of space at the top of each jar (this is called headspace) so the brine can fully cover the tomatoes.
Step 3: Make the brine
In a small non-reactive saucepan, combine the water, distilled white vinegar, kosher salt, and sugar. Place the pan over medium-high heat and bring the mixture just up to a gentle simmer, stirring occasionally until the salt and sugar are completely dissolved.
Once the brine is clear and steaming, remove it from the heat. You do not need to boil it hard; the goal is simply to dissolve the salt and sugar and heat the liquid so it helps draw flavor into the tomatoes more quickly.
Step 4: Pour the hot brine over the tomatoes
Place the jars of tomatoes on a folded kitchen towel to help insulate them from the temperature change. Using a ladle and a funnel if you have one, carefully pour the hot brine over the tomatoes and aromatics in each jar.
Pour slowly and gently, making sure the tomatoes are fully covered. If needed, use the back of a clean spoon or a chopstick to nudge and settle the tomato slices so they sit below the level of the brine. Leave about 1/2 inch of headspace at the top of each jar.
If you run short on brine, you can top off with a little extra hot vinegar-and-water mixture in a 1:1 ratio, seasoned lightly with a pinch more salt and sugar.
Step 5: Cool, cover, and refrigerate
Let the jars sit uncovered at room temperature until they are no longer warm to the touch, about 30–60 minutes. During this time, some air bubbles may rise to the surface. If you see bubbles trapped between tomato slices, gently tap the jars on the counter or insert a clean chopstick along the inside of the jar to release them.
Once the jars are at room temperature, wipe the rims with a clean, damp cloth, then seal with the lids. Transfer the jars to the refrigerator and let them cure for at least 24 hours before eating. The flavor will deepen and the tomatoes will become more evenly pickled after 48–72 hours.
Step 6: Serve and enjoy
When you are ready to eat, use a clean fork or tongs to remove the pickled green tomatoes from the brine. Layer them onto sandwiches and burgers, tuck into grilled cheese, or chop them to top tacos, grain bowls, or salads. They are also excellent as part of a cheese board or charcuterie platter.
Always return the jar promptly to the refrigerator and keep the tomatoes submerged in the brine for best texture and shelf life.
Pro Tips
- Choose very firm tomatoes. The firmer and greener the tomatoes, the crunchier your pickles will be. Avoid any that feel soft or have bruises.
- Pack jars tightly. Snugly packed tomato slices stay submerged more easily and hold their shape better in the brine.
- Balance the heat. Taste your chilies: if they are very spicy, use fewer slices and supplement with red pepper flakes so you can better control the heat level.
- Let them sit. They are edible after 24 hours, but the flavor and color are much better after 2–3 days. If you can wait, you will be rewarded.
- Use non-iodized salt. Kosher or pickling salt gives a clean, bright flavor and clear brine. Iodized table salt can cloud the brine and taste harsher.
Variations
- Extra spicy chili-garlic pickles: Add 2 more cloves of garlic (for a total of 6), double the fresh chilies, and add 1/2 tsp crushed red pepper flakes per jar for a bold, spicy kick.
- Bread-and-butter style green tomato pickles: Increase the sugar to 1/2 cup, add 1 tsp celery seeds, and a few slices of fresh ginger to the brine. This gives a sweeter, more aromatic pickle that is excellent on burgers and fried chicken sandwiches.
- Herb garden version: Along with the dill, tuck in a few sprigs of fresh thyme or oregano and a strip of lemon zest in each jar for a more complex, herbal flavor.
Storage & Make-Ahead
These are refrigerator pickles, not shelf-stable canned pickles, so they must be kept cold.
Store the jars in the refrigerator for up to 2 months. The tomatoes will be at their crunchiest in the first 3–4 weeks, but they remain safe and tasty beyond that as long as they stay refrigerated and submerged in the brine. Always use a clean utensil to remove pickles from the jar to avoid introducing bacteria.
For make-ahead, you can prepare the jars up to 2 days before adding the brine: layer in the tomatoes and aromatics, cover, and refrigerate. When you are ready, heat and pour in the brine, cool, and then cure as directed.
Nutrition (per serving)
Approximate values per serving (about 1/4 cup pickled green tomatoes with brine): 8 calories, 0 g fat, 0 g saturated fat, 2 g carbohydrates, 1 g sugar, 0 g protein, 0 g fiber, about 230–280 mg sodium. Actual values will vary based on the salt you use and how much brine you consume.
