
Quick Recipe Version (TL;DR)
Quick Ingredients
- 2 1/2 cups (300 g) cake flour
- 2 1/2 tsp baking powder, 1/2 tsp baking soda, 1/2 tsp fine salt
- 3/4 cup (170 g) unsalted butter, softened
- 1 3/4 cups (350 g) granulated sugar
- 4 large eggs, room temperature
- 2 tsp vanilla extract
- 1 cup (240 ml) whole milk + 1/2 cup (120 g) sour cream
- 2 1/2 cups (300 g) raspberries (fresh or frozen) + 1/3 cup (65 g) sugar + 2 tbsp (16 g) cornstarch + 2 tbsp (30 ml) lemon juice
- 1 1/2 cups (340 g) unsalted butter (for frosting)
- 4 cups (480 g) powdered sugar
- 8 oz (225 g) white chocolate, chopped (plus 3 oz / 85 g more for curls)
- 1/4 cup (60 ml) heavy cream or milk
- 1 1/2 cups (175 g) fresh raspberries for decorating
Do This
- 1. Preheat oven to 350°F (175°C). Grease and line three 8-inch round pans. Mix dry ingredients; cream butter and sugar, beat in eggs and vanilla, then alternate adding dry mix with milk and sour cream. Divide into pans and bake 22–26 minutes. Cool completely.
- 2. For raspberry filling, simmer raspberries, sugar, lemon juice, cornstarch, and a splash of water until thick and jammy. Cool fully until spreadable.
- 3. For frosting, melt 8 oz white chocolate and let cool until slightly warm. Beat butter and salt until creamy, mix in powdered sugar, then beat in melted white chocolate and cream until fluffy.
- 4. Level cooled cake layers. Place first layer on stand, spread a thin layer of frosting, pipe a frosting “dam” around the edge, and fill center with raspberry filling. Repeat with second layer.
- 5. Top with third layer. Apply a thin crumb coat of frosting over entire cake and chill 20–30 minutes.
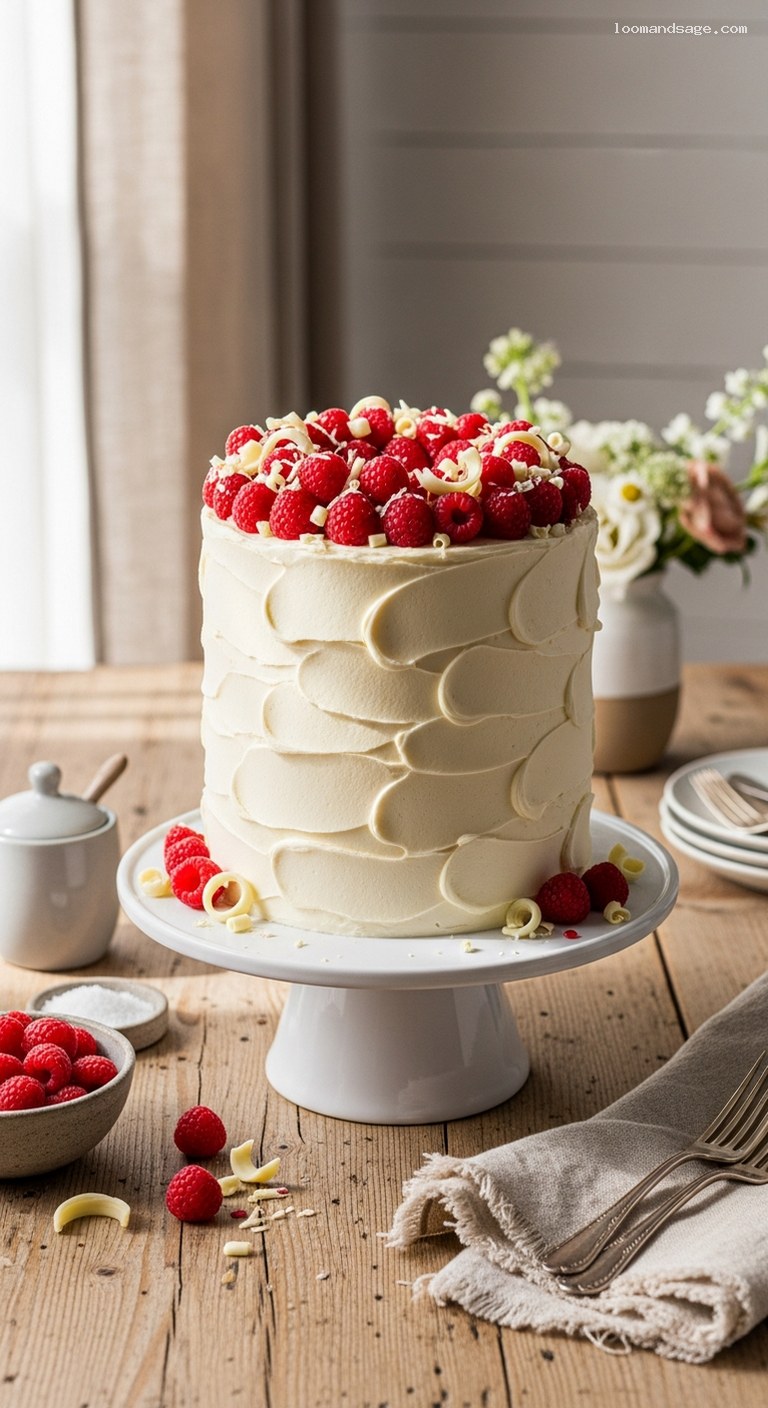
- 6. Frost cake smoothly with remaining buttercream. Decorate top with fresh raspberries and white chocolate curls or shavings.
- 7. Chill at least 30 minutes before slicing for neat layers. Serve slightly cool or at room temperature.
Why You’ll Love This Recipe
- Perfect balance of creamy white chocolate sweetness and bright, tangy raspberries.
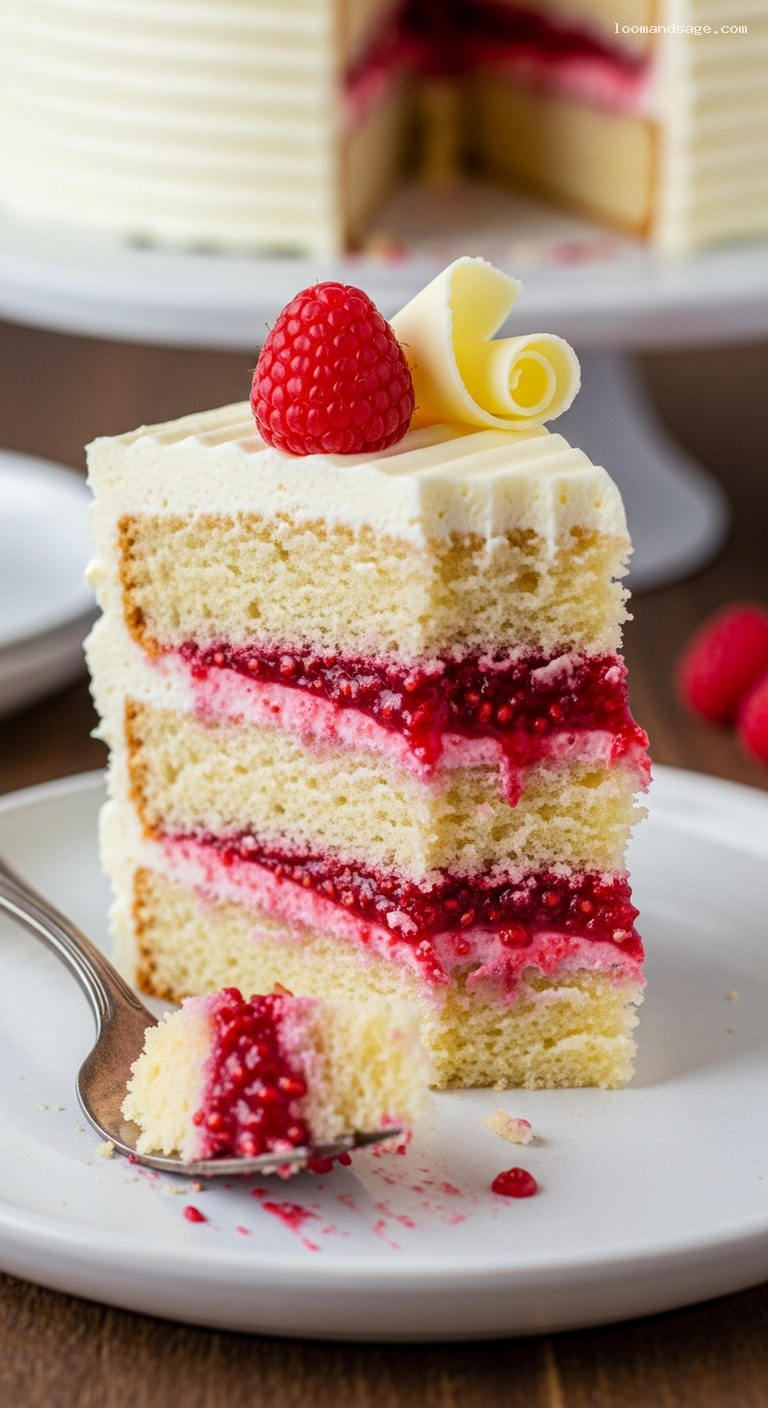
- Moist, tender vanilla cake layers that slice into gorgeous, distinct stripes of cake, filling, and frosting.
- Elegant enough for birthdays, showers, and holidays, but doable in a home kitchen.
- Flexible: make the raspberry filling from scratch or use good-quality preserves to save time.
Grocery List
- Produce: Fresh raspberries, lemon
- Dairy: Unsalted butter, whole milk, sour cream (or plain Greek yogurt), heavy cream, eggs
- Pantry: Cake flour (or all-purpose), granulated sugar, powdered sugar, baking powder, baking soda, fine salt, cornstarch, vanilla extract, white chocolate bars or chips, neutral oil for pans (optional), raspberry preserves (optional)
Full Ingredients
For the Vanilla Cake Layers
- 2 1/2 cups (300 g) cake flour, spooned and leveled
- 2 1/2 tsp baking powder
- 1/2 tsp baking soda
- 1/2 tsp fine sea salt
- 3/4 cup (170 g) unsalted butter, at room temperature
- 1 3/4 cups (350 g) granulated sugar
- 4 large eggs, at room temperature
- 2 tsp pure vanilla extract
- 1 cup (240 ml) whole milk, at room temperature
- 1/2 cup (120 g) sour cream or full-fat plain Greek yogurt, at room temperature
For the Raspberry Filling
- 2 1/2 cups (300 g) raspberries, fresh or frozen (no need to thaw if frozen)
- 1/3 cup (65 g) granulated sugar
- 2 tbsp (16 g) cornstarch
- 2 tbsp (30 ml) fresh lemon juice
- 2 tbsp (30 ml) water
- Pinch of fine salt
- 1/2 tsp vanilla extract (optional, for extra depth)
- Time-saving option: Instead of the homemade filling above, you can use about 1 1/2 cups (450 g) good-quality seedless raspberry preserves.
For the White Chocolate Buttercream
- 1 1/2 cups (340 g) unsalted butter, at room temperature (3 standard sticks)
- Pinch of fine sea salt
- 4 cups (480 g) powdered sugar, sifted
- 8 oz (225 g) good-quality white chocolate, finely chopped
- 1/4 cup (60 ml) heavy cream or whole milk, plus 1–2 tbsp extra if needed
- 2 tsp pure vanilla extract
For Assembly & Decoration
- 1–1 1/2 cups (175–200 g) fresh raspberries, for decorating the top and sides
- 3 oz (85 g) white chocolate, for curls or shavings
- Extra raspberry filling or preserves (optional), for drips or extra garnish on slices
Step-by-Step Instructions
Step 1: Prepare the pans and preheat the oven
Preheat your oven to 350°F (175°C) with a rack in the center. Grease three 8-inch (20 cm) round cake pans with butter or nonstick spray. Line the bottoms with parchment paper rounds, then lightly grease the parchment as well. This extra step helps ensure the delicate layers release cleanly.
Set out all cold ingredients (butter, eggs, milk, sour cream) so they can come to room temperature. Room-temperature ingredients mix more easily and give you a finer, more even crumb.
Step 2: Make the vanilla cake batter
In a medium bowl, whisk together the cake flour, baking powder, baking soda, and salt. Set aside.
In a large mixing bowl (or the bowl of a stand mixer fitted with the paddle attachment), beat the softened butter on medium speed for about 1 minute, until creamy. Add the granulated sugar and beat on medium-high speed for 3–4 minutes, until very light and fluffy. Scrape down the sides of the bowl as needed.
Add the eggs one at a time, beating well after each addition. Mix in the vanilla extract. The mixture may look slightly curdled at this point, which is fine.
In a small bowl or liquid measuring cup, whisk together the milk and sour cream until smooth.
With the mixer on low speed, add the dry ingredients to the butter mixture in three additions, alternating with the milk mixture (dry–wet–dry–wet–dry). Mix just until the flour is incorporated and the batter looks smooth. Do not overmix once the flour is in, or the cake can turn dense.
Step 3: Bake and cool the cake layers
Divide the batter evenly among the three prepared pans (a kitchen scale helps: each pan should get roughly the same weight of batter). Smooth the tops with an offset spatula.
Bake for 22–26 minutes, or until the cakes are lightly golden, spring back when gently pressed in the center, and a toothpick inserted into the center comes out clean or with a few moist crumbs.
Cool the cakes in their pans on a wire rack for 10–15 minutes. Then carefully run a knife around the edges, turn the cakes out onto the rack, and peel off the parchment. Let the layers cool completely to room temperature before filling and frosting, at least 1 hour. For easier handling, you can wrap cooled layers in plastic and chill them for 30–60 minutes.
Step 4: Make the raspberry filling
While the cakes bake or cool, make the filling. In a small bowl, stir together the cornstarch and water until smooth (this helps prevent lumps). In a medium saucepan, combine the raspberries, sugar, lemon juice, salt, and the cornstarch mixture.
Cook over medium heat, stirring frequently, until the raspberries break down and the mixture comes to a gentle boil, 5–8 minutes. Once bubbling, cook for 1–2 minutes more, stirring constantly, until the mixture thickens to a jam-like consistency. It should coat the back of a spoon and hold a line when you drag a spoon through it. Remove from the heat and stir in vanilla extract, if using.
Transfer the filling to a shallow bowl and let it cool to room temperature. To speed this up, you can place the bowl in the refrigerator and stir occasionally. The filling must be completely cool and fairly thick before you spread it between the layers, or it will ooze out.
Shortcut: If you are using raspberry preserves instead, simply stir them until smooth and, if they seem thin, warm them briefly with 1–2 tsp cornstarch over low heat until slightly thickened, then cool completely.
Step 5: Make the white chocolate buttercream
Finely chop the 8 oz (225 g) white chocolate and place it in a microwave-safe bowl. Microwave in 15–20 second bursts, stirring well between each, until just melted and smooth. You can also melt it in a heatproof bowl set over a pan of barely simmering water. Set aside to cool until just slightly warm to the touch; if it is hot, it will melt the buttercream.
In a large bowl or stand mixer, beat the 1 1/2 cups (340 g) softened butter and a pinch of salt on medium speed for 2–3 minutes until very creamy and pale. Gradually add the powdered sugar, about 1 cup at a time, mixing on low speed until combined, then increasing to medium until smooth. Scrape down the bowl as needed.
With the mixer on low, slowly pour in the cooled melted white chocolate, mixing until incorporated. Add the vanilla and 1/4 cup (60 ml) heavy cream or milk, then beat on medium-high speed for 2–3 minutes, until the frosting is fluffy and spreadable. If it seems too thick, add more cream or milk 1 tablespoon at a time. If it is too soft, chill it for 10–15 minutes, then re-whip briefly.
Step 6: Level and fill the cake layers
If the cake layers have domed tops, use a long serrated knife to gently level them so they are flat. Place a small dollop of buttercream on your cake stand or serving plate to act as glue, then set the first cake layer in the center, cut side up if you leveled it.
Spread a thin layer of white chocolate buttercream (2–3 tablespoons) over the top of the first layer. Then, using a piping bag fitted with a large round tip (or a zip-top bag with the corner snipped), pipe a thick ring of buttercream around the outer edge of the cake. This “dam” keeps the raspberry filling from leaking out.
Spoon about half of the completely cooled raspberry filling into the center of the ring and spread it gently to the piped buttercream border. Top with the second cake layer and repeat: a thin swipe of buttercream, a piped dam, and the remaining raspberry filling. Place the final cake layer on top, bottom side up for the flattest surface.
Step 7: Crumb coat and chill
Using an offset spatula, spread a thin layer of buttercream over the top and sides of the stacked cake. This is your crumb coat; it traps any loose crumbs so the final layer looks smooth. Do not worry if some crumbs show through at this stage.
Place the crumb-coated cake in the refrigerator for 20–30 minutes, or in the freezer for about 15 minutes, until the buttercream is firm to the touch. Chilling makes it much easier to apply a smooth final coat and prevents the layers from sliding.
Step 8: Frost, decorate, and serve
Once the crumb coat is set, apply the remaining white chocolate buttercream in a thicker layer over the top and sides of the cake. Use a spatula or bench scraper to smooth the frosting, or swirl it decoratively for a softer, rustic look.
For the decoration, mound fresh raspberries in the center or in a wreath around the top edge of the cake. To make white chocolate curls, gently drag the edge of a vegetable peeler along the side of a room-temperature white chocolate bar, letting the curls fall onto a plate. Scatter curls and shavings over the top of the cake and around the raspberries. You can also press a few raspberries and curls around the bottom edge for an extra-pretty finish.
Chill the finished cake for at least 30 minutes before slicing so the layers set. For the best flavor, let slices sit at room temperature for 15–20 minutes before serving.
Pro Tips
- Keep ingredients at room temperature. Soft butter and room-temperature eggs, milk, and sour cream help the batter emulsify properly and give the cake a finer crumb.
- Do not rush the cooling. Both the cake layers and the raspberry filling must be completely cool before assembling, or the filling can melt the frosting and cause the layers to slide.
- Use real white chocolate. Choose bars or high-quality chips that list cocoa butter in the ingredients; candy melts or “coating” wafers will not give the same rich flavor.
- Thin, strong raspberry filling. Cook the filling until it is quite thick; it will thicken further as it cools. If it spreads like syrup, it needs more cooking time.
- Chill for clean slices. For celebration-worthy slices with sharp raspberry stripes, chill the assembled cake, then use a long, sharp knife dipped in hot water and wiped dry between cuts.
Variations
- Preserves-only shortcut: Skip the homemade filling and use about 1 1/2 cups of good-quality seedless raspberry preserves. If needed, thicken slightly with a teaspoon or two of cornstarch cooked in.
- White chocolate drip finish: Make a quick drip by mixing 4 oz (115 g) melted white chocolate with 3 tbsp (45 ml) warm heavy cream. Cool slightly, then drip around the chilled cake’s edges before adding raspberries.
- Cupcake version: Bake the cake batter in lined muffin tins at 350°F (175°C) for 18–20 minutes. Core each cooled cupcake, fill with raspberry filling or preserves, then top with white chocolate buttercream and a single raspberry.
Storage & Make-Ahead
Because of the fresh fruit, store this cake covered in the refrigerator. It keeps well for up to 4 days. For the best texture and flavor, let the cake or slices sit at room temperature for 20–30 minutes before serving so the buttercream softens.
You can make the cake layers up to 2 days in advance: wrap each completely cooled layer tightly in plastic wrap and store at room temperature, or freeze for up to 2 months. Thaw frozen layers, still wrapped, at room temperature before filling. The raspberry filling can be made 3–4 days ahead and kept in an airtight container in the fridge. The frosting can be made 1–2 days ahead; refrigerate, then bring to room temperature and re-whip before using.
Nutrition (per serving)
Approximate values for 1 slice (1/12 of cake): about 720 calories; 10 g protein; 88 g carbohydrates; 38 g fat; 24 g saturated fat; 300 mg sodium; 2–3 g dietary fiber. Actual values will vary based on specific brands and exact portion sizes.
